How to connect a domain with a Minecraft server
How to connect a Domain with a Minecraft server?
There are so many ways to make your Minecraft server more attractive to players and different. We have already touched on installing different plugins and resource packs in our related articles, so make sure to check them out. However, even with those configurations, your Minecraft server might not represent your vision fully. If you have a dedicated server and a dedicated player base, you might look into purchasing a custom domain name, to make your server pop even more.
Now, we often get questions about how to link the purchased domain to a Minecraft server and make the IP address much more attractive and easier to remember for your server visitors. A server with an IP address consisting only of numbers looks unattractive and is hard to remember. For that instance, we want to use a subdomain, which would change the IP address of a server to one with your purchased domain name. While the process of connecting a custom domain name to your Minecraft server is straightforward, it can often be confusing for those who have never done it. Therefore, this tutorial should help both beginners and those with a knowledge base on how to do it but want to remember what kind of a DNS record is needed.
What is needed for me to connect a domain with a Minecraft server?
The only two things you need for a successful operation is a dedicated Minecraft server and a domain name. You can acquire both of these components on our website under the Services tab. The minecraft server is needed for the dedicated IP address and the server port, also that we could link the domain to something, and the domain itself can be as custom as you please, meaning you can get as creative as you can possibly be (maybe think of a pun or something that best represents the server).
Now that you have both the Minecraft server and the custom domain name, we can link these two together.
Where do I find the information for a DNS record?
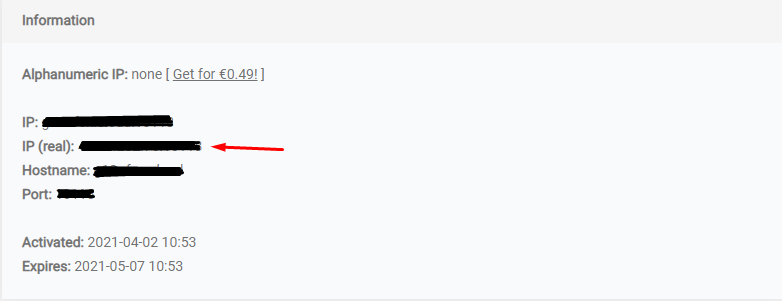
Firstly, you need to gather all the essential information about your Minecraft server.
Go to your Minecraft server Control panel and in the main tab, you will find all the crucial information. From this tab you only need the IP address (real) and the server port number, with it you can generate and add all the necessary DNS records.
Where do I enter the DNS records?
After purchasing the custom domain and waiting for it to become activated, go to the DNS management section of your domain and you will find 3 fields at the very bottom: Name, Type, Value. Here, enter the DNS record that will be generated by the generator.

DNS record generator
IP = Server numerical IP (e.x: 192.168.0.1)
PORT = Numbers after the numerical IP (e.x: xxx.xxx.x.x:25565)
Beginning = Beginning we want to add to the IP (e.x: play.domain.com)
P.S Once you add these 3 DNS records, it usually takes up to 24 hours to get everything synced with the global DNS server, so the custom domain you created for the Minecraft server may not work for some players for a while.
And there you have it - a custom server address for an easier connection to your server.
Summary
Playing Minecraft can be a great and rewarding experience, regardless of your age, and having your own Minecraft server will help you enjoy the game with your friends. Knowing how to reach the full potential of your server will help you build a strong and cohesive server community. Also, it is easier to manage each game server with a custom domain.
If you have any questions always contact support via live chat or email us at [email protected] , and we will gladly guide you through the whole process and answer any questions you have.
Similar tutorials
How to use PuTTY programPuTTY is a free and open-source SSH client most widely used on Windows for secure connections to remote systems over the...
Risk-free server migration: what every project owner should know Changing a server in the business world is often like moving into a new house, with...